A Pocket-Sized Field Sketch of One Found Leaf
A pocket-sized field sketch of one found leaf helps you notice its outline, proportions and surrounding spaces using only a notebook and pencil.
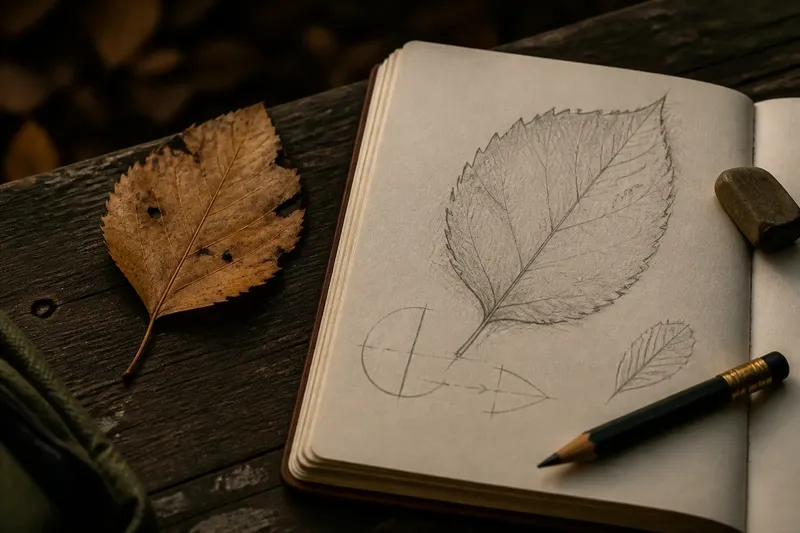
A pocket-sized field sketch of one found leaf starts with a small decision: draw the leaf in front of you, not the plant you think it came from. Set it beside a notebook, turn it until its shape reads clearly, and take a moment to notice its outline, proportions and surrounding spaces. The aim is not identification or botanical accuracy. It is a portable exercise in seeing.
1. Choose a leaf that can sit still
Pick a fallen leaf that is dry enough to handle and broad enough for its edges to be legible. A simple oval, a pointed blade or a leaf with an uneven margin can all work. A torn edge is useful, too: the gap gives you a particular feature to observe rather than a flaw to correct.
Leave attached leaves where they are, and avoid collecting from places where removal is restricted. If a leaf is damp, brittle or curled, sketch it as found rather than pressing it flat. Its surface shifts are part of its visible shape.
Use a pocket notebook with uncoated paper, a pencil that makes a clear line, and an eraser if you like. A clipped pencil or short coloured pencil is convenient outdoors. You do not need a ruler, camera or field guide. Those tools can pull attention towards measuring or naming when the exercise is about looking.
2. Set up the page as a small field
Choose a page with enough room for the leaf and a little blank space around it. Lay the leaf beside the page or place it on a plain surface, such as a bench or sheet of scrap paper. Avoid arranging it into an ideal pose. Start with the position it naturally takes, then rotate it only if one part overlaps another and hides the outline.
Notice how much of the page the leaf will occupy. If it looks too large in your view, move the page farther away; if it looks tiny, bring it closer. Keep the distance comfortable and steady while you draw. This is not a scale drawing. The goal is a composition that gives the outline room to breathe.
Before making a mark, look at the spaces beyond the leaf. There may be a narrow wedge beside a stem, a broad curve above a shoulder, or a small notch between two points. These shapes are useful clues to the leaf’s position and proportion.
3. Find the long direction before the edge
Most leaves have a direction that carries the eye from stem towards tip. Notice that direction and lightly place two small marks to indicate its ends. Add a faint centre line between them if it helps. The line is a guide, not a claim that every leaf is symmetrical.
Compare the leaf’s width with its length. Is it widest near the middle, closer to the stem, or nearer the tip? Does one side bulge more than the other? Answering in plain language can keep the sketch from becoming a generic leaf shape.
Mark the widest point with a light tick, then glance back at the object. Check whether that point sits where you expected. If not, move the tick before drawing the outline. A few small placements can matter more than a fussy, continuous contour.
4. Draw the outline in observed stretches
Follow the edge in short, deliberate runs rather than tracing every tooth or wobble at once. Look at one bend, then draw it. Move to the next change in direction. The line may be uneven; that is information about your attention, not a reason to shade over it.
For a smooth-edged leaf, notice where the curve flattens or tightens. For a serrated edge, group small points into their overall rhythm instead of counting them. Keep the stem attached to the outline as a visible extension, and note where it meets the blade. That junction often helps orient the whole form.
If you lose your place, stop and look at the actual edge again. Do not invent a tidy continuation from memory. The sketch records one encounter with this particular leaf, including parts that are lopsided, clipped or partly folded.
5. Use the spaces around the leaf to check proportion
Once the outline is in place, compare the surrounding blank shapes with the leaf itself. Is the space on the left broader than the one on the right? Does the pointed end leave a narrow triangle above it? These comparisons can reveal that your drawing has drifted or become too symmetrical.
Imagine you find a small, heart-shaped leaf on a park path and place it on a notebook page. Your first outline puts the tip too high, leaving almost no space above it. You look again, lower the tip, and notice that the blank crescent near the stem now matches the object more closely. The resulting drawing relates its parts more convincingly, without needing a perfect contour.
Try a simple check: cover the drawn leaf with your hand and look at the empty shapes around it. Then cover the real leaf and look at the page. If the negative spaces feel markedly different, find where the mismatch begins and adjust only that part. This keeps correction focused rather than turning the whole outline into a series of guesses.
6. Add only the details that explain the form
A central vein can show direction. A few side veins can suggest how the blade opens from the stem. Choose only marks that clarify the shape you have already drawn. If you copy every visible vein, the details may compete with the outline and make the sketch harder to read.
Look for surface changes that affect the form: a fold that lifts one edge, a crease that interrupts the centre line, or a small hole that changes the silhouette. Mark these sparingly. Colour is optional; if you add it, use a light patch or a single pencil tone rather than filling every area uniformly.
Do not label the leaf with a species name unless identification is a separate task you want to undertake. A plain note such as “pointed tip, uneven left edge” keeps attention on what you actually saw and avoids suggesting more certainty than the drawing supports.
7. What should I do if the leaf keeps moving?
Can I hold the leaf in place?
Yes. Rest one fingertip lightly on the stem or use a small, removable paperweight beside the leaf. Keep the edge visible, and avoid pinning or flattening it if you want to capture its natural curl.
Should I draw a curled leaf from above?
Draw the shape visible from your chosen view, including any overlap or lifted edge. If the curl hides part of the outline, note that the contour disappears there instead of completing it by assumption.
What if the leaf is too fragile to move?
Leave it where it lies and sketch from that position. Turn the notebook rather than the leaf, keeping the page close enough to compare the visible edge without handling the specimen.
How do I know when the sketch is finished?
Stop when the main outline, its proportions and the spaces around it are clear enough to recognise the arrangement you observed. A few informative marks are sufficient; more detail is not automatically more attentive.
8. Close the page with a useful observation
Write a brief note beside the drawing: the surface it rested on, the direction of the light, or the feature that took longest to see. Choose one observation, not a complete account of the outing. If the leaf was unusually folded or one edge disappeared against a dark surface, say so plainly.
Then look from the real leaf to the page once more. Ask whether the drawing preserves its particular balance: where it widens, where it narrows, and how the blank space changes around it. If one relation feels wrong, add a light correction and leave the rest alone. A pocket-sized field sketch trains your eye during an ordinary pause, without requiring a name for what you found or a polished picture to take home.