The Myth of the Perfect First Draft
A handmade first draft is a test, not a miniature final piece. Learn what to make, what to notice and how to choose the next change.
How polished should a handmade first draft be? For most small projects, it should be clear enough to test and rough enough to change. A first draft is not a promise that the finished object must look exactly like it; it is a way to discover what a sketch, measurement or plan cannot tell you.
That distinction matters whether you are adapting a tin into a desk organiser, making a fabric pouch or shaping a small wooden stand. A pristine prototype can make flaws feel expensive to admit. A deliberate test version gives you permission to ask better questions: does it sit comfortably, open easily, hold its contents, or suit the place where it will be used?
What is a handmade first draft for?
A handmade first draft turns an idea into something you can handle. It lets you check relationships between parts that are difficult to judge on paper: how wide an opening feels, whether a flap clears a button, or where an object’s weight makes it tip. The aim is not to make an inferior copy. It is to make the uncertainty visible.
Choose the main question before you begin. If you are making a pouch, perhaps you need to know whether a phone can slide in and out without catching on the lining. If you are adapting a jar as a brush holder, perhaps the question is whether its base stays steady on your work surface. One draft can answer several related questions, but a short list keeps you from treating every small detail as equally important.
Keep the test close to the intended use. A model that looks convincing on a table may behave differently when carried, opened, leaned on or stored. Use the object in the place and manner you have in mind, while keeping the trial within ordinary, safe use. A draft that tests the relevant action is more informative than a polished object that has never left the workbench.
How rough can the first version be?
Roughness is useful when it saves effort without hiding the answer. Scrap card can stand in for a rigid panel; an old pillowcase can help you judge the shape of a fabric cover; masking tape can hold a paper mock-up together while you check proportions. Use materials that are easy to alter, and make the temporary nature of the draft obvious to yourself.
But a substitute should behave enough like the final material to answer the question. Thin paper will not tell you how a thick folded fabric edge affects a closure. Soft card may buckle where a stiff panel would stay upright. If the material’s weight, flexibility, thickness or surface friction matters, use a sample of the intended material for that part, even if the rest of the draft is improvised.
Also separate appearance from function. A plain version can tell you whether a pocket is placed well, but it may not show how a patterned fabric changes the visual balance. You do not need to finish every surface. Add only the features that help answer the question currently in front of you.
What should you test before refining the design?
Test the actions and conditions that could force a meaningful redesign. For an object with a lid, try opening and closing it with the hand you expect to use. For a holder, place the intended contents inside and check whether the object remains accessible. For a foldable item, open and fold it several times in ordinary use, noticing where the material resists or creases awkwardly.
Look at the object from the distance and position where it will be used. A small shelf label may be legible close up but hard to read from across a room. A handle may look balanced in a drawing yet feel poorly placed when you lift the object. Observe what your hands and eyes actually do rather than defending the layout you started with.
Give the draft a little context, too. Put it beside nearby objects, try it in the drawer where it will be stored, or carry it in the bag it is meant to fit. These checks can expose clashes in size, access or placement that isolated inspection misses. Avoid turning a casual model into a test of load-bearing or hazardous use; work involving structural, electrical, gas or chemical risks calls for appropriate professional guidance.
How do you know what to change next?
Change the feature that most affects the intended use, not the feature that is easiest to fuss over. A crooked decorative line can wait if the opening is too narrow. A colour choice can wait if the stand wobbles. Write down what happened in plain terms, then connect it to one possible adjustment.
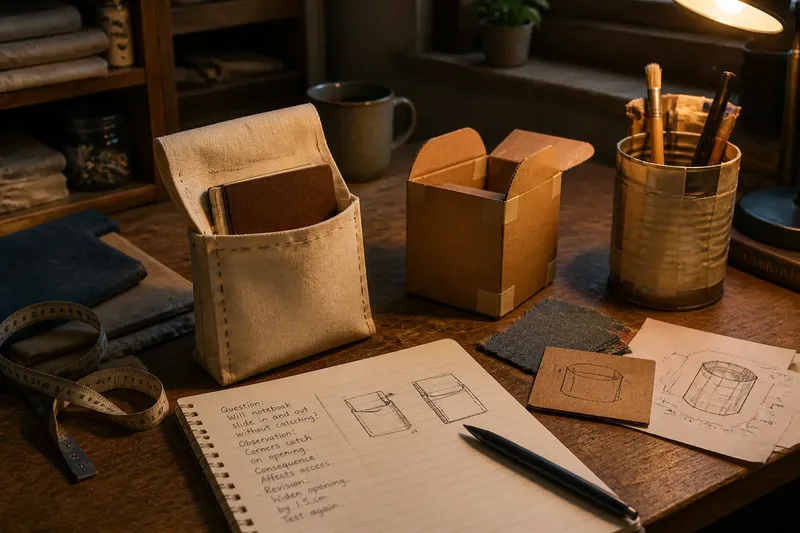
Say you are making a fabric pouch for a small notebook. In an invented situation, the first draft uses scrap cloth and a temporary folded top; when you slide the notebook in, the corners catch at the opening. You note that the opening is the problem, rather than deciding that the whole shape has failed. For the next draft, you widen that area and test the same action again; the observable result you want is a notebook that enters without snagging, while the pouch still fits the intended place.
Changing one major feature at a time makes the next draft easier to read. If you widen the pouch, move its closure and change the fabric all at once, you may not know which change helped or created a new problem. When several changes are inseparable, record them together and judge the result against the original question instead of pretending you can isolate their effects.
- Write the observation: “The lid catches on the rim” is more useful than “the model feels wrong”.
- Name the consequence: note whether the problem affects access, comfort, stability, fit or appearance.
- Choose a revision: decide which feature to alter and what you expect to notice afterward.
- Keep a record: a quick phone photograph beside a pencil note can preserve details that are easy to forget.
When should you stop making drafts?
Stop when the questions that could change the design have been answered well enough for you to commit to the materials and finish. That does not require certainty about every detail. It means you can explain why the main proportions, joins, openings and placement suit the intended use, and you are no longer discovering a fundamental mismatch each time you handle the object.
Some decisions are best left for the final version. Surface finish, decorative stitching and exact colour may depend on materials you do not want to cut or apply until the construction is settled. Keep a short note of those open choices so they do not quietly become forgotten assumptions. If you are working to a material’s label or a maker’s instructions, follow those directions; local requirements also matter where they apply.
It is also reasonable to make another draft when the cost of a wrong commitment is high or the design has changed substantially. A second model is not evidence that the first was wasted. The first may have ruled out a shape, exposed an awkward reach or shown that a feature deserves a different location. Each draft earns its place by narrowing a decision.
What questions do makers ask about first drafts?
Should a first draft use the final material?
Use the final material where its thickness, stiffness, grip or drape affects the question you are testing. For other parts, a substitute may be enough, provided it does not disguise a likely problem.
How do you make a prototype without wasting supplies?
Use offcuts, reusable fastenings and temporary joins for questions about shape and placement. Save scarce or difficult-to-cut material for the version whose main dimensions and construction choices have already been checked.
What if the first draft looks unattractive?
Ask whether the appearance is the question being tested. If it is not, treat the rough surface as a reminder that this version exists to reveal decisions, not to stand in for the finished object.
Can a first draft be digital?
A drawing or simple digital model can help compare proportions and arrange parts before you cut material. It cannot fully show how an object feels in the hand, moves against a surface or behaves under ordinary use, so make a physical version when those qualities matter.
How does a rough draft lead to a stronger final design?
A rough draft improves the final design by moving decisions from guesswork into observation. It does not tell you what to make; it gives you a clearer basis for choosing what to change, preserve or leave alone. That makes the eventual commitment more deliberate without requiring every uncertainty to disappear.
Keep the first draft, or take a photograph before dismantling it, when its lesson might be useful later. Add a note naming the question it answered and the change you chose. The most valuable record is often small: a marked opening, a taped seam, or a sketch beside a plain sentence about what happened.
When you begin your next handmade first draft, give it a job before you give it a finish. A simple question, a material that answers it and an honest observation can spare a promising idea from being polished into the wrong shape.